DQ170
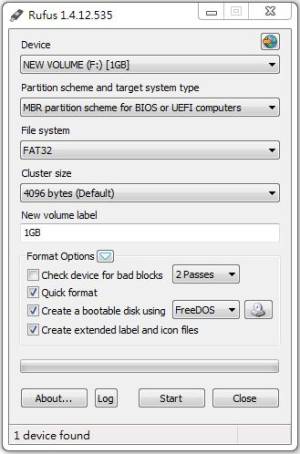
How to make a bootable USB flash drive?
Warning: Please be sure that there are no other USB devices connected to your system during formatting like external hard disks, external optical devices or other USB flash drives. This ensures that you only format the selected USB flash drive.
- Please download the Rufus tool from https://rufus.akeo.ie/ and extract the file.
- Please run Rufus.exe.
- Select your USB flash drive, and press the Start button, then confirm the following Warning popup.
How do I update the BIOS version in UEFI (UEFI Mode)?
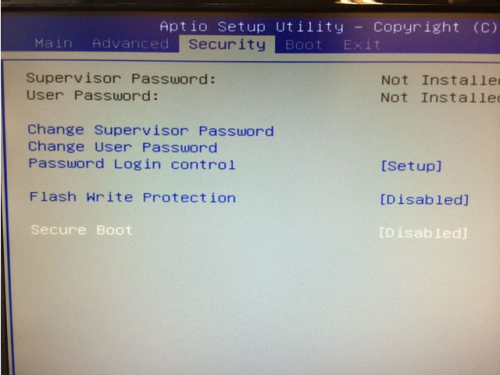
- Make sure the BIOS option Secure Boot is disabled.
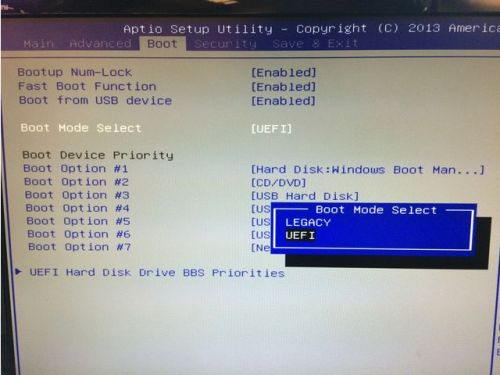
- Change “Boot Mode Select” to UEFI
- Go to the Shuttle download area and download the appropriate BIOS version: https://global.shuttle.com/support/download
- Unpack the ZIP file into an empty folder.
- Copy the subfolders
EFI,SHELLand the filestartup.nshto a USB stick, formatted in FAT32.

- Boot from the USB stick. You may have to press
F7for boot device selection. Pick the USB drive containing the files. - The update will start automatically. The system will reboot afterwards.
- Once reboot is completed, please enter the BIOS setup program by pressing the
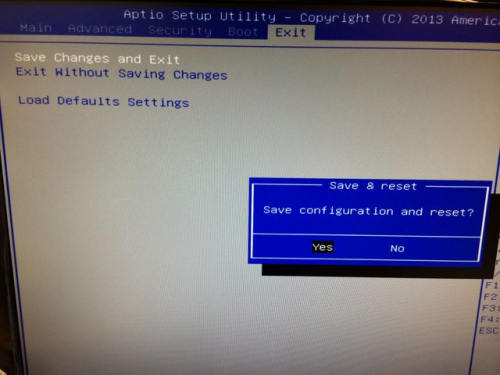
DelorF2key and load the “Default Settings” (F3), then confirm by hitting Save & Exit.
Introduction to vPro
Intel® vPro™ is a brand name for a specific set of management and security technologies.
Intel® Active Management Technology (AMT) is a subset of Intel vPro technology.
Intel AMT allows remote access to the PC for management and security tasks, even if the operating system is down, the hard drive has crashed or the PC is powered off, as long as the platform is connected to line power and to a network. Independent software vendors (ISVs) can build applications that take advantage of the features of Intel AMT using the application programming interface (API).
Requirements: Intel® vPro Technology requires a set of hardware and software features:
- a vPro-enabled processor - please see below table
- a vPro-enabled chipset and BIOS, as provided by DQ170
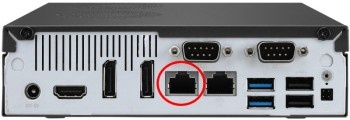
- a vPro-enabled network port - please use the left LAN port of DQ170
- correct firmware settings and appropriate software
vPro-enabled processors
List of vPro-enabled LGA 1151 desktop processors, which can be used with DQ170.
Only Core i5 / i7 models (except the K series) support the vPro function.
| Class | Model | vPro |
|---|---|---|
| Core i7 | 6700 | ✔ |
| 6700T | ✔ | |
| 7700 | ✔ | |
| 7700T | ✔ | |
| Core i5 | 6600 | ✔ |
| 6600T | ✔ | |
| 6500 | ✔ | |
| 6500T | ✔ | |
| 7600 | ✔ | |
| 7600T | ✔ | |
| 7500 | ✔ | |
| 7500T | ✔ |
Which LAN port can be used for vPro?
Rear view of the DQ170 - only the left network port is enabled for Intel® vPro Technology.
DQ170 BIOS Setup Configuration
- Please press the “Del” key while booting to enter BIOS.

- Enter the “Advanced” tab and the “Trusted Computing” menu.
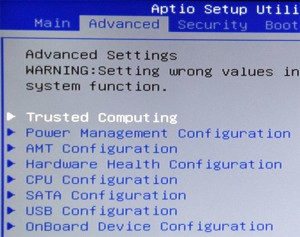
- Select “Security Device Support” to enable the Hardware TPM module:

The DQ170 is equipped with a Trusted Platform Module (TPM v2.0): Nuvoton Digital IC NPCT6 with FW software (Version 1.3). TPM is an international standard for a secure crypto processor, which is a dedicated microcontroller designed to secure hardware by integrating cryptographic keys in devices. This module only supports UEFI mode, not Legacy mode. Windows 7 requires the Microsoft Hotfix KB2920188 (see DQ170 download page) to be installed. This is not required for Windows 10 installations. - Enter the “AMT Configuration” menu to configure the AMT-related settings.
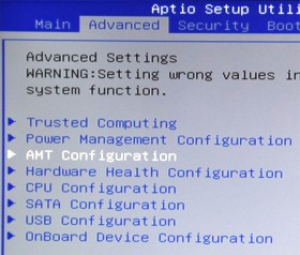
- Please enter the AMT Configuration menu and make sure:
- “Intel AMT” is set to “enabled”
- “MEBx Selection Screen” is set to “enabled”. In this case the system will show “Press <CTRL+P> to Enter MEBX setup menu” during boot process.
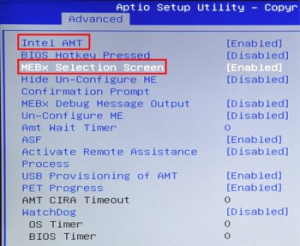
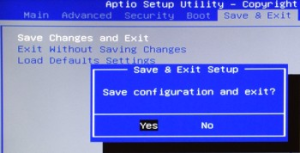
- Save Changes and Exit the BIOS Setup Utility - the system will now re-boot.
DQ170 MEBX Setup Configuration
- Please press the <CTRL + P> keys while booting to enter the MEBX setup menu. (MEBX = Intel® Management Engine BIOS Extension)

- Please log in to the MEBX setup menu - the default password is “admin” (case sensitive).
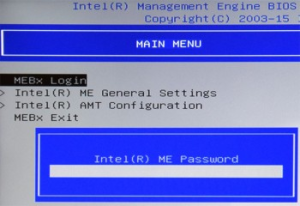
- On first time login, the system will request a new password to be set.
Enter “Intel(R) ME General Setting” to set a new password.
Password rule: At least one capital letter + digit character + non alpha-numeric character, for example: Admin123456!

- Go to the TCP/IP settings as follows:
- Main menu
- Intel(R) AMT Configuration
- Network Setup
- TCP/IP setting
- Wired LAN IPV4 Configuration
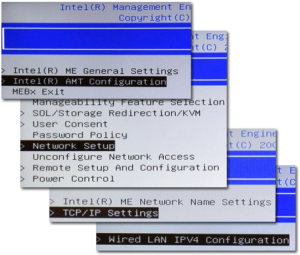
- Here, the “DHCP Mode” and the local IP information can be set.
When configuring a vPro-enabled device, it is recommended the MEBX firmware and operating system share the same type of network configuration, so that each is DHCP-enabled or have static IP addresses.
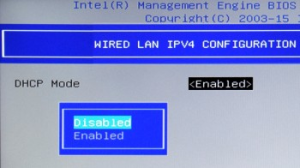
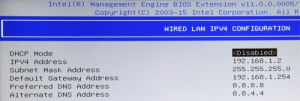
- Please enter “Activate Network Access”.
This activates the current network settings and opens the ME network interface.
This option disappears after activation.
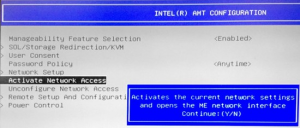
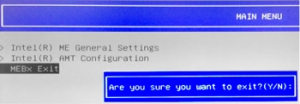
- After performing all changes, please exit the MEBX setup menu.
Appropriate vPro-Software
There are several management console applications available which can be used to set up and manage Intel vPro technology-based PCs like the DQ170. We picked out two applications:
Intel vPro Manager
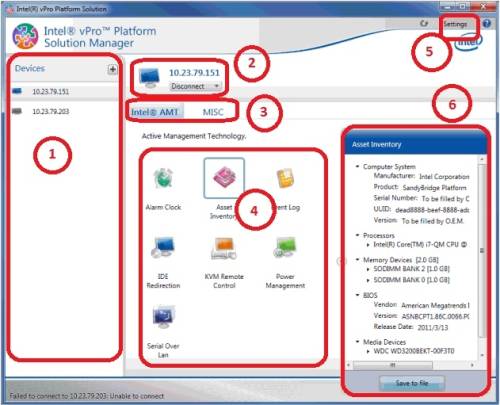
Intel vPro Platform Solution Manager (60 days test version) This is a framework application that allows you to launch plugin applications (“plugins”) to remotely manage your Intel® vPro™ technology-based PC clients. The available plugins perform tasks such as Alarm Clock, Asset Inventory, Event Log, IDE-Redirection, KVM Remote Control, Power Management, and Serial Over LAN. The plugins can be used for evaluation purposes within a limited period of time.
- Download and install Intel vPro Platform Solution Manager on the control side PC
The Main Screen:
- This is a display that shows which AMT clients you have added and wish to manage.
- This is the system you are currently connected to.
- These are the categories of the available plugins.
- This is the plugin panel. For the Intel AMT category, this shows all the feature plugins that are available.
- Settings: You can specify saving a list of machines on exit, automatically connect to machines in a list, save the log data on exit and you can view the log file.
- When selecting a plugin, a new window pertaining to the plugin selected will open.
Intel® Active Management Technology SDK
Independent software vendors (ISVs) can build applications that take advantage of the features of Intel AMT using the application programming interface (API) which acts very simple and consistent across all Intel AMT versions and SKUs. This enables software developers to easily build support for Intel AMT features into their applications. API Download
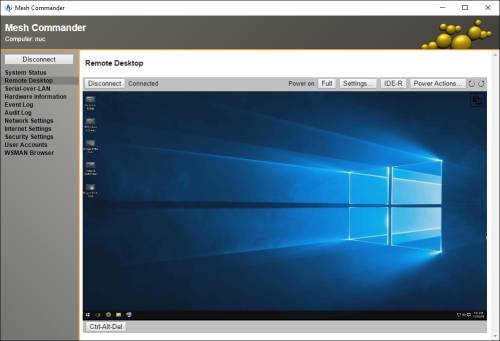
MeshCommander
MeshCommander (Apache 2.0 License, Open Source)
This is a web-based Intel AMT console. Web applications are flexible and offer many deployment options.
- Remote management tool for Intel® AMT computers
- Intel AMT can be managed entirely from a browser
- Can be installed on an IIS web server in your network
- Source code and samples available to build your own web-based Intel AMT tools (Download)
Current Features:
- Hardware KVM viewer: remote control from own keyboard, video monitor, mouse
- Serial-over-LAN VT100 terminal (SOL aka Console Redirection): enables the I/O of the serial port of a managed system to be redirected over IP.
- IDE-Redirect support (IDE-R): remote imaging of non-functioning devices
- Power control
- AMT Event and Audit log viewer with filter box
- Hardware asset
- Account management - allows the administrator to delegate some features to others
- Network settings overview for wired/wireless interface, supports IPv4 and IPv6
- WIFI management
- User consent control
- Enabled feature control
- Certificate & TLS management
- CIRA & Environment Detection
- WSMAN browser (Web Services Management)
