This is an old revision of the document!
DQ170
About vPro
Intel® vPro™ is a brand name for a specific set of management and security technologies.
Intel® Active Management Technology (AMT) is a subset of Intel vPro technology.
Intel AMT allows remote access to the PC for management and security tasks, even if the operating system is down, the hard drive has crashed or the PC is powered off, as long as the platform is connected to line power and to a network. Independent software vendors (ISVs) can build applications that take advantage of the features of Intel AMT using the application programming interface (API).
Requirements: Intel® vPro Technology requires a set of hardware and software features:
- a vPro-enabled processor - please see below table
- a vPro-enabled chipset and BIOS, as provided by DQ170
- a vPro-enabled network port - please use the left LAN port of DQ170
- correct firmware settings and appropriate software
List of processors featuring Intel vPro technology
| Class | Model | Cores/Threads | CPU Clock | Turbo Clock | Cache | TDP | Graphics Engine | Graphics Clock | vPro |
|---|---|---|---|---|---|---|---|---|---|
| Core i7 | 6700 | 4/8 | 3.4 GHz | 4.0 GHz | 8 MB | 65 W | HD 530 | 350~1150 MHz | ✔ |
| 6700T | 4/8 | 2.8 GHz | 3.6 GHz | 8 MB | 35 W | HD 530 | 350~1100 MHz | ✔ | |
| Core i5 | 6600 | 4/4 | 3.3 GHz | 3.9 GHz | 6 MB | 65 W | HD 530 | 350~1150 MHz | ✔ |
| 6600T | 4/4 | 2.7 GHz | 3.5 GHz | 6 MB | 35 W | HD 530 | 350~1100 MHz | ✔ | |
| 6500 | 4/4 | 3.2 GHz | 3.6 GHz | 6 MB | 65 W | HD 530 | 350~1150 MHz | ✔ | |
| 6500T | 4/4 | 2.5 GHz | 3.1 GHz | 6 MB | 35 W | HD 530 | 350~1100 MHz | ✔ |
Which LAN port is featuring vPro functions?
Please use the left ethernet port of DQ170 for remote management.
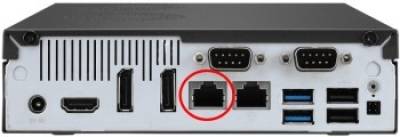
(Rear view of DQ170)
DQ170 BIOS Setup Configuration
- Please press the “Del” key while booting to enter BIOS.

- Enter the “Advanced” tab and the “Trusted Computing” menu
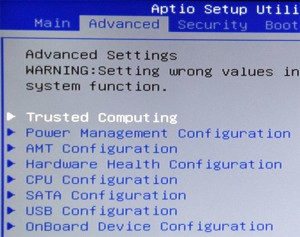
- With the “Security Device Support” setting, you can enable the Hardware TPM module:

DQ170 is equipped with a Trusted Platform Module (TPM v2.0): Nuvoton NPCT650AAAWX. TPM is an international standard for a secure cryptoprocessor, which is a dedicated microcontroller designed to secure hardware by integrating cryptographic keys into devices. This module can only support UEFI mode, not legacy mode. Under Windows 7 you need to install the Microsoft Hotfix KB2920188 (see DQ170 download page) - under Windows 10 there is no problem. - Enter the “AMT Configuration” menu to configure the AMT related settings.

- Please perform the following settings in this AMT Configuration menu:
- Set “Intel AMT” to “enabled”
- Set “MEBx Selection Screen” to “enabled” - then the system will show “Press <CTRL+P> to Enter MEBX setup menu” during the boot process.

- Save Changes and Exit the BIOS Setup Utility - the system will boot again.

DQ170 MEBX Setup Configuration
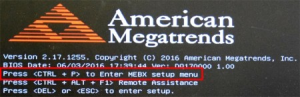
- Please press the <CTRL + P> keys while booting to enter MEBX setup menu. (MEBX = Intel® Management Engine BIOS Extension)
- Please login the MEBX setup menu - the default password is “admin” (case sensitive).
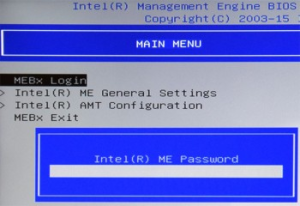
- During first time login, the system will request to set a new password.
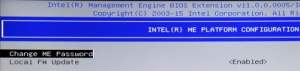
You can enter “Intel(R) ME General Setting” in order to set a new password.
Password rule: At least one upper case letter + digit character + non alpha-numeric character, for example: Admin123456!
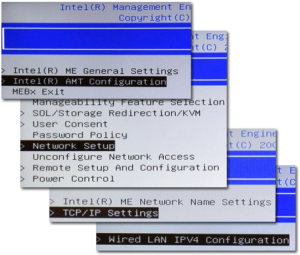
- Go to the TCP/IP setting by following this path:
- Main menu
- Intel(R) AMT Configuration
- Network Setup
- TCP/IP setting
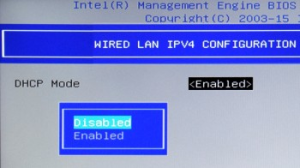
- Wired LAN IPV4 Configuration
- On this page you can disable the “DHCP Mode” and set local IP information. When configuring a vPro-enabled device it is best that the MEBX firmware and operating system share the same type of networking configuration, so that each is DHCP-enabled or static IP address.

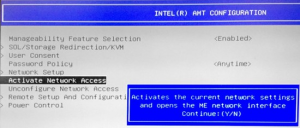
- Please enter the option “Activate Network Access”.
This activates the current network settings and opens the ME network interface. This option disappears after activation.
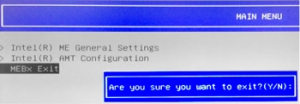
- After performing all setting, you can exit MEBX setup menu.