Table of Contents
Windows-related FAQ
Integration of VGA/LAN driver into the Windows 11 installation media
This FAQ will help to have a proper resolution, or network access, during Windows 11 installation.
Preparation:
- Download the Windows 11 Image as ISO from Microsoft: https://www.microsoft.com/en-us/software-download/windows11
- Download the “Win Toolkit”: https://share.shuttle.eu/index.php/s/QF3izHOUMYaFShW/download
- Download and Extract the VGA and LAN driver for your XPC model: https://global.shuttle.com/download/download
Using the “Win Toolkit” to integrate driver prior installation
- Open the Win Toolkit
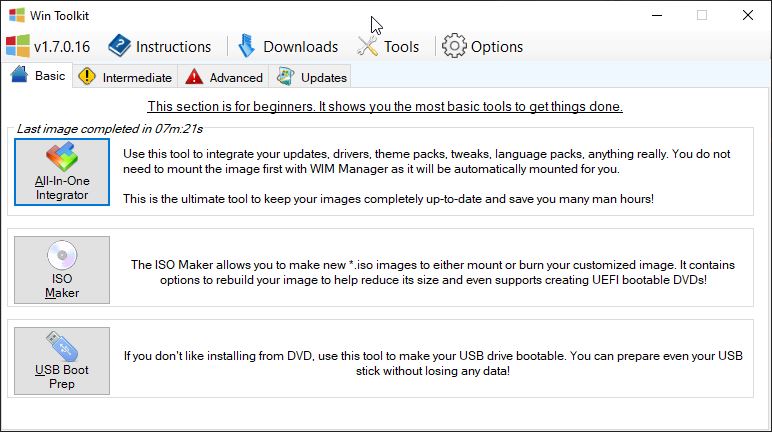
- Open the “All-In-One Integrator”
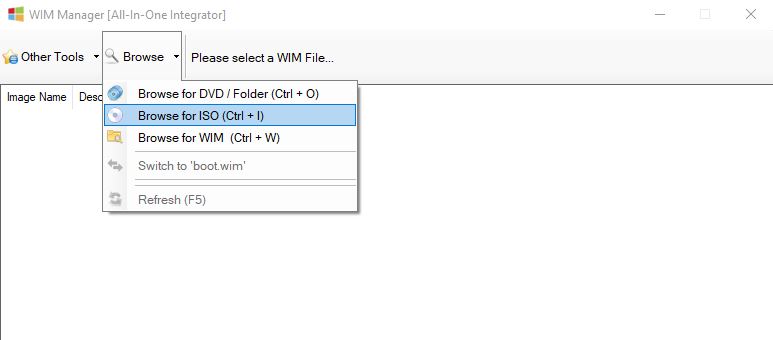
- Open “Browse” and “Browse for ISO“
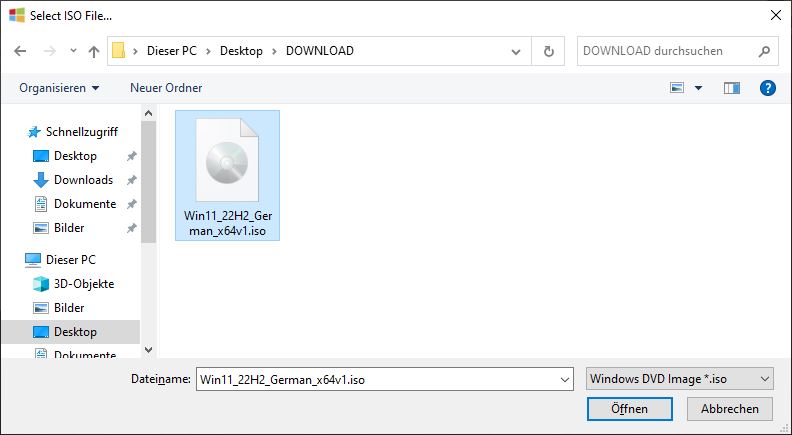
- Select the downloaded Windows 11 ISO from your PC
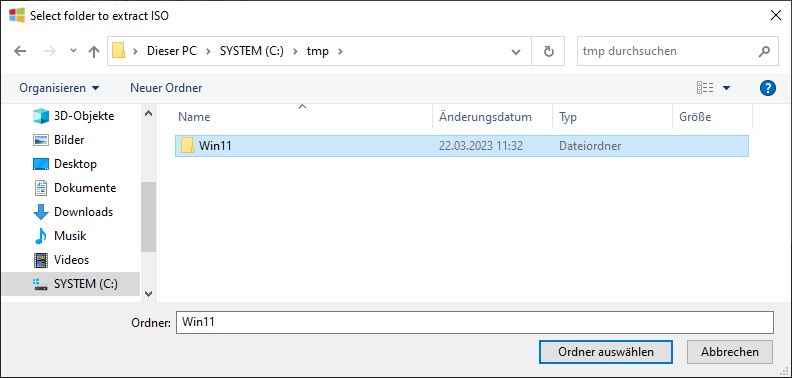
- Select a folder, where the ISO will be extracted (e.g.
C:\temp\Win11)
- Wait for the ISO to be extracted
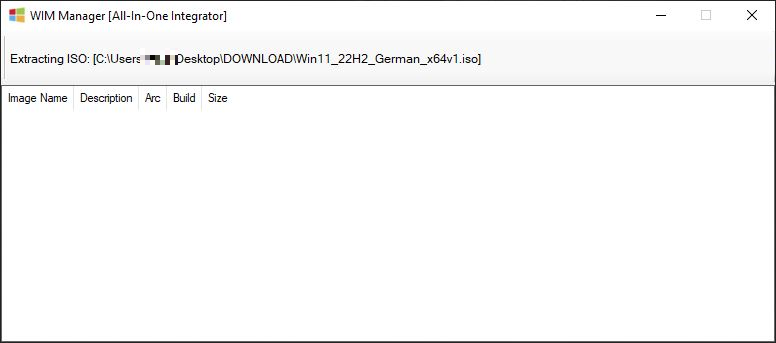
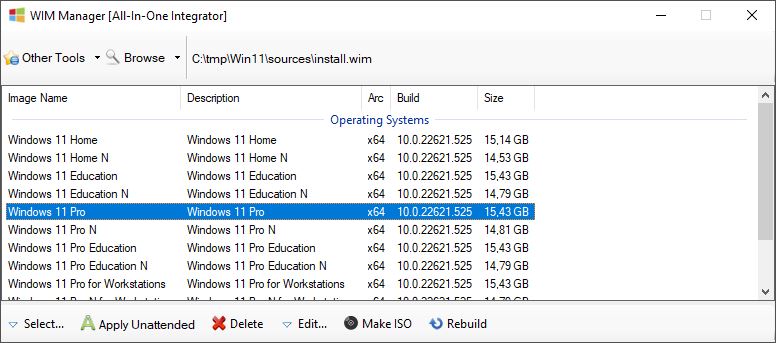
- Select the Windows 11 Version you want to modify (double click)
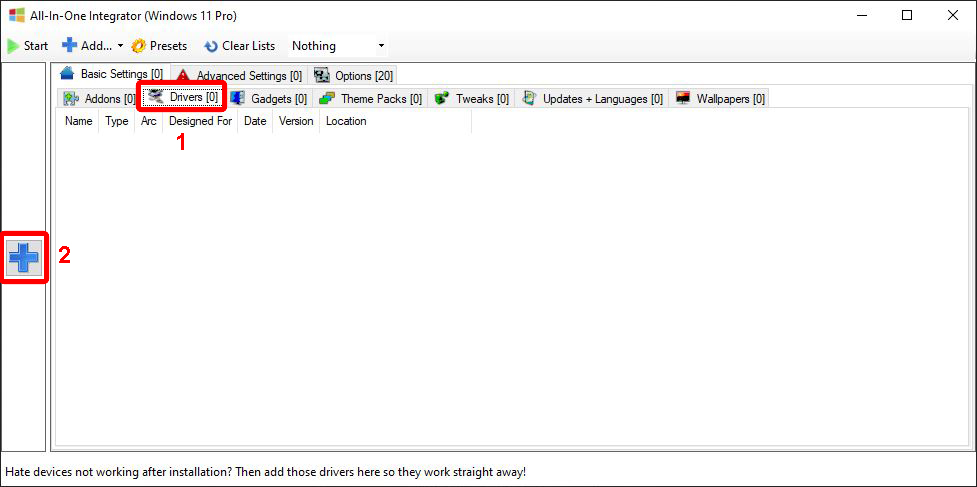
- Select “Driver”. Then select the ”+” to add driver.
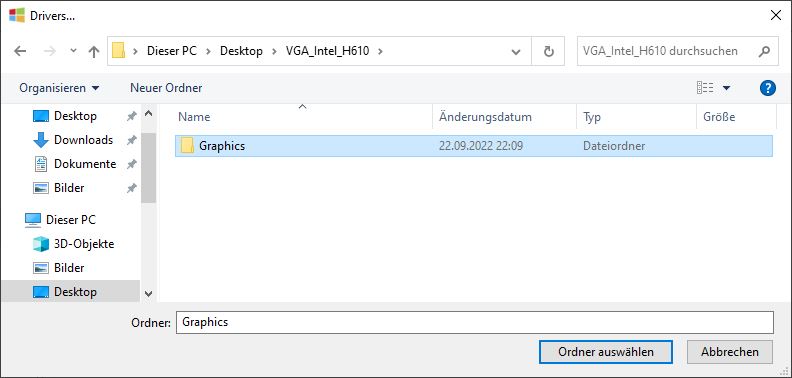
- Select the folder with the previously downloaded and extracted driver.
The tool will automatically search for the correct files in sub-folders.
- Once all required driver are loaded (Repeat step 8+9), press “START”.
This process take several minutes, depending on your HDD/SSD speed.
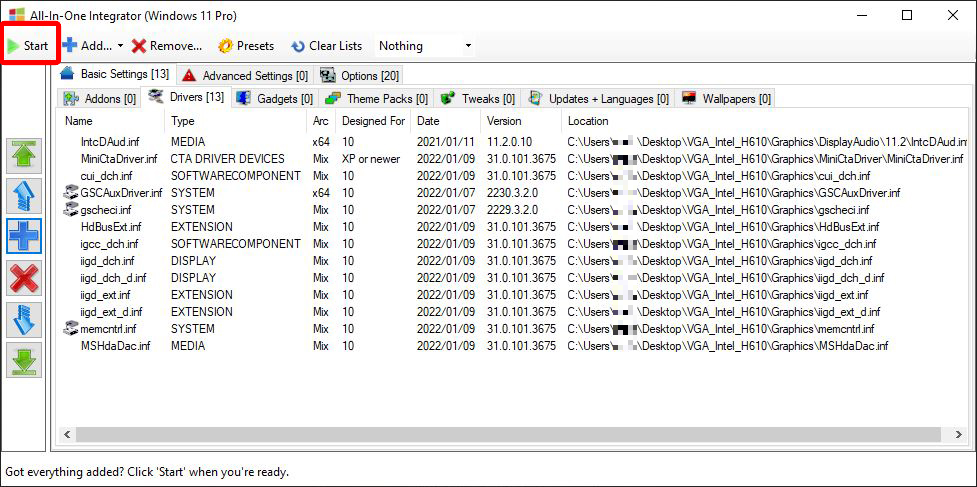

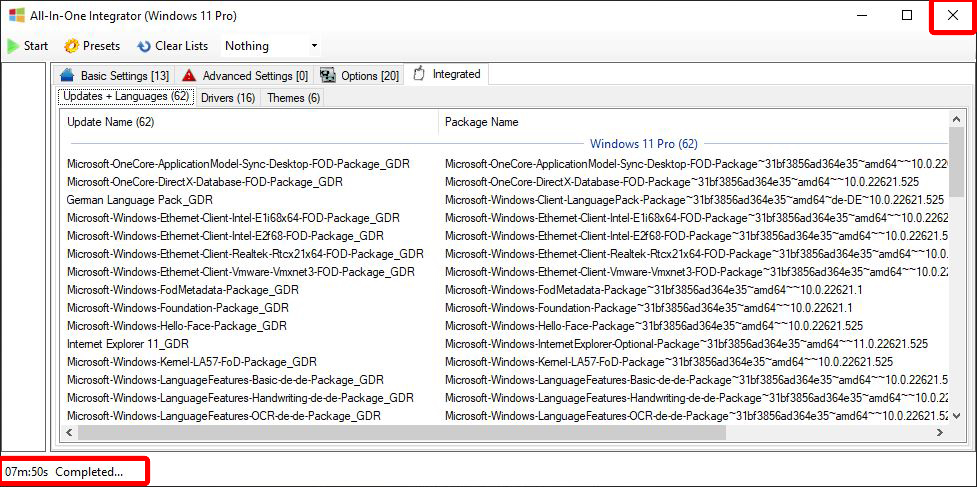
- After completion, close this Windows with the “X”.
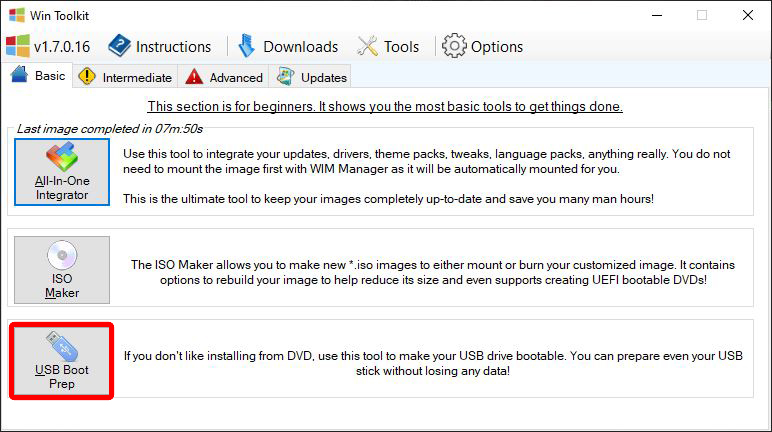
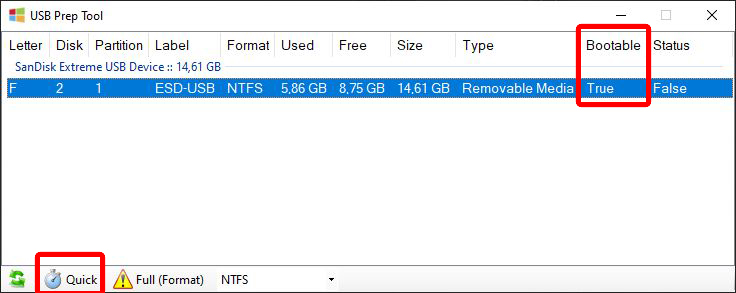
- Prepare the USB Stick for installation. It must set to “bootable” (8GB+ capacity recommended).
- Copy all files from the TEMP folder to the bootable USB drive.
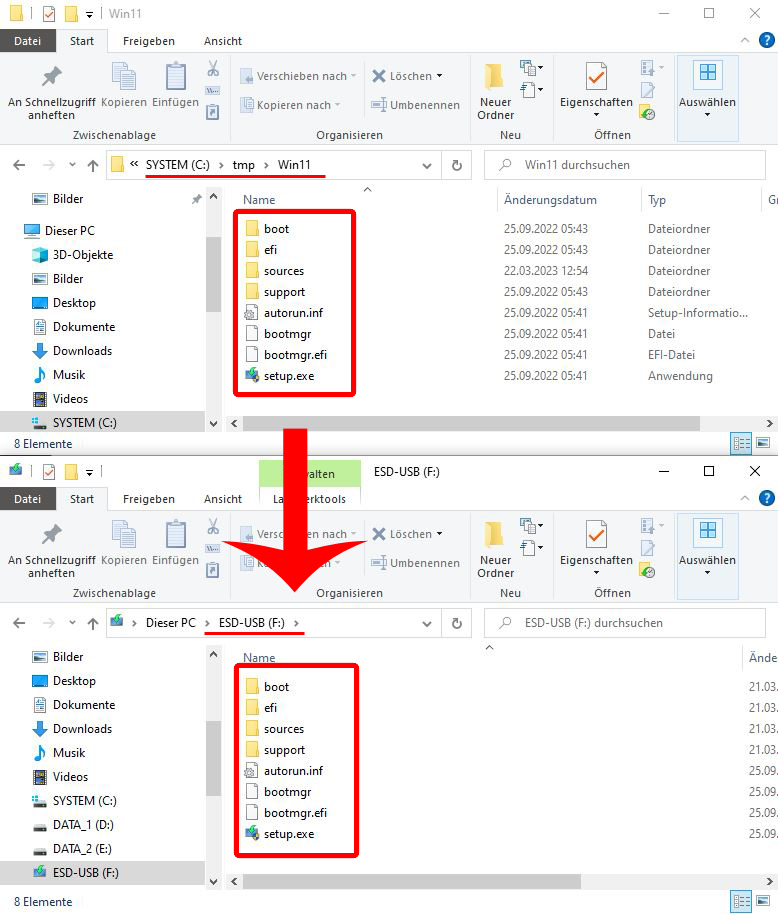
- The USB drive is now able to install Windows 11 with proper graphics resolution and available Ethernet cards.
Windows 11 compatibility
Windows 11 demands TPM 2.0 (Trusted Platform Module). All current Shuttle products have this feature.
Microsoft provides all information on Windows 11 here. A free, easy to use test tool for checking compatibility is also offered here.
Be sure to check beforehand whether the Security Device Support entry is set to Enabled in the BIOS in the Advanced menu.

Alternatively, you can use the Device Manager in Windows to find out whether your PC contains a TPM 2.0 module.
- Start the Device Manager (via the search in the Start menu or by pressing the Windows key + X and entering
devmgmt.msc). - The item Security Devices must be present and below it an entry Trusted Platform Module 2.0, as shown here:
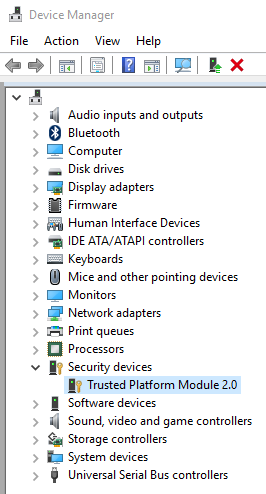
If this is not the case, the chances of your Shuttle PC being suitable for Windows 11 are rather slim.
For a TPM support list of older Shuttle products, please have a look at this table.
Compatibility list
| Category | Model | New installation of Windows 11 64-bit | Upgrade from Windows 10 64-bit to Windows 11 64-bit |
|---|---|---|---|
| Edge | EN01E | Not supported | Not supported |
| EN01J3, EN01J4 | Not supported | Not supported | |
| XPC cube | SH110R4 | Not supported | Not supported |
| SH170R6 | Not supported | Not supported | |
| SZ270R8 | Not supported | Not supported | |
| SZ270R9 | Not supported | Not supported | |
| SH310R4 | Successful* | Successful* | |
| SH310R4V2 | Successful* | Successful* | |
| SH370R6 | Successful* | Successful* | |
| SH370R6V2 | Successful* | Successful* | |
| SH370R8 | Successful* | Successful* | |
| SH510R4 | Successful* | Successful* | |
| SH570R6 | Successful* | Successful* | |
| SH570R8 | Successful* | Successful* | |
| SW580R8 | Successful* | Successful* | |
| XPC slim (1.3L) | DA320 | Successful* | Successful* |
| DH02U, DH02U5 | Not supported | Not supported | |
| DH110 | Not supported | Not supported | |
| DH110SE | Not supported | Not supported | |
| DQ170 | Not supported | Not supported | |
| DH270 | Not supported | Not supported | |
| DH310 | Successful* | Successful* | |
| DH310S | Successful* | Successful* | |
| DH310V2 | Successful* | Successful* | |
| DH32U, DH32U5 | Successful* | Successful* | |
| DH370 | Successful* | Successful* | |
| DH410 | Successful* | Successful* | |
| DH410S | Successful* | Successful* | |
| DH470 | Successful* | Successful* | |
| XPC slim (1.3L fanless) | DL10J | Successful* | Successful* |
| DL20N, DL20N6 | Successful* | Successful* | |
| DS10U, DS10U3, DS10U5, DS10U7 | Successful* | Successful* | |
| DS20U, DS20U3, DS20U5, DS20U7 | Successful* | Successful* | |
| DS68U | Not supported | Not supported | |
| DS77U, DS77U3, DS77U5, DS77U7 | Not supported | Not supported | |
| DX30 | Not supported | Not supported | |
| XPC slim (3L) | XC60J | Not supported | Not supported |
| XH110, XH110V | Not supported | Not supported | |
| XH110G | Not supported | Not supported | |
| XH270 | Not supported | Not supported | |
| XH310, XH310V | Successful* | Successful* | |
| XH310R, XH310RV | Successful* | Successful* | |
| XH410G | Successful* | Successful* | |
| XPC nano | NC02U, NC02U3, NC02U5, NC02U7 | Not supported | Not supported |
| NC03U, NC03U3, NC03U5, NC03U7 | Not supported | Not supported | |
| NC10U, NC10U3, NC10U5, NC10U7 | Successful* | Successful* | |
| XPC all-in-one | P20U | Not supported | Not supported |
| P51U, P51U3 | Successful* | Successful* | |
| P90U, P90U3, P90U5 | Not supported | Not supported | |
| P92U, P92U3, P92U5 | Successful* | Successful* | |
| X50V6, X50V6U3 | Not supported | Not supported | |
| X50V7, X50V7U3 | Successful* | Successful* | |
| X50V8, X50V8U3 | Successful* | Successful* | |
| Box PC | BPCWL02 | Successful* | Successful* |
| BPCWL03 | Successful* | Successful* | |
| Panel PC | P21WL01 | Successful* | Successful* |
*Please install drivers from our download section or update drivers via Windows update.
Date: 2022-09-01
How do I create a Windows 10 restore medium?
In case you need to reset your PC to its factory settings, if, for instance, you have accidentially wiped the internal hard disk, we recommend that you create a complete “System Image” immediately after initial startup.
The procedure is described below. WE STRONGLY RECOMMEND YOU FOLLOW THESE STEPS!
WARNING: Under certain circumstances this procedure may not back up settings, files and subsequently installed programs and settings. Therefore, please make sure you back up your data regularly. Shuttle cannot be held liable for any kind of data loss nor for any consequences resulting thereof.
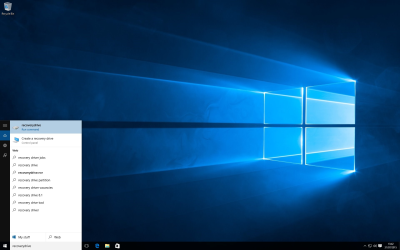
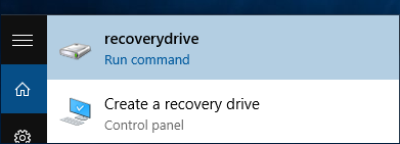
1. Enter “recoverydrive” in the search box and confirm with “Enter”.
 |  |
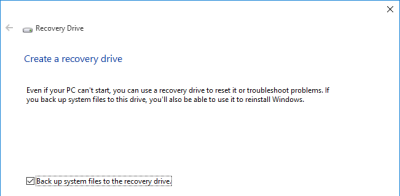
2. This opens a program to create a recovery drive.
 | 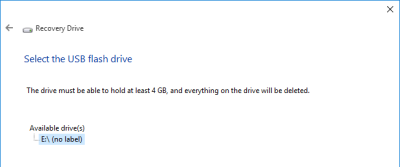 |
3. Select the storage medium to which you want to copy the “recovery drive”.
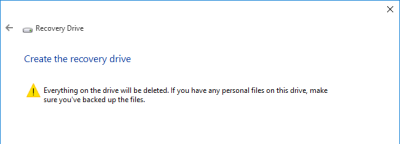
4. The next window warns you that all data on the data storage medium will be deleted. If relevant, back up the data and continue by hitting “Create”.
 | 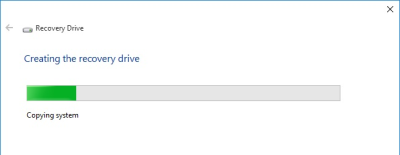 |
5. The “recovery environment” is now created and saved on the data storage medium.
 |
Once you have finished, make sure you store the “system recovery data storage medium” in a safe place.
How do I perform a Windows 10 system reset?
The following steps let you restore the factory settings of your Shuttle XPC complete system. You may either use a “System Image” stored on your PC or one you have created yourself.
WARNING: Under certain circumstances it is possible that the following steps wipe data from your hard disk. This can include settings, files and user-installed programs. Therefore, please make sure you to back up your data regularly. Shuttle cannot be held liable for any kind of data loss nor for any consequences resulting thereof.
If your PC will not start up, there are a number of repair and system recovery options.
Method 1
Problem description Windows 10 will not start up. An error message occurs shortly after switching on or the “System Recovery Options” are loaded automatically.
Diagnosis Boot sector or Windows start-up files damaged.
Solution Check and repair boot sector or Windows start-up files.
1. Switch on your monitor (does not apply to All-in-One PCs). 2. Switch on your complete Shuttle system.
If the “System Recovery Options” do not start up automatically, follow the sub-steps below. Otherwise please skip to point:
 a- Attach a USB stick/USB hard disk to your PC.
 b- Insert the "System Repair Disk" or "External Recovery Media" DVD.
 c- Switch on your monitor (does not apply to All-in-One PCs).
 d- Switch on your Shuttle complete system.
 e- Press the "ESC", "F7" or "F11" key shortly after the monitor posts to access the boot menu.
 f- In this menu, please select "USB HDD" and confirm your choice.
 g- This loads the "System Recovery Options".
 h- Continue with Point 3.
3. Select the “Troubleshoot” menu option.
 |
4. In the next window, please select “Advanced options”.
 |
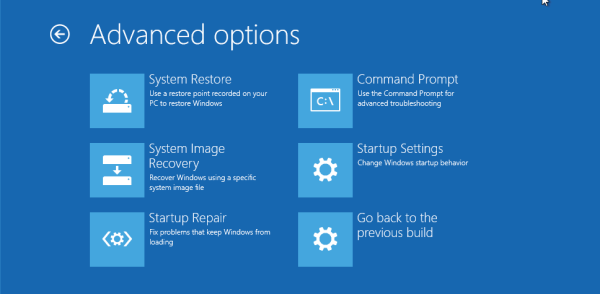
5. Here, you'll see the “Startup Repair” option. Please select this option for the system to perform a diagnostic check of the PC. Once this is completed, follow the on-screen instructions.
 |
If this won't work, please proceed with Method 2.
Method 2
Problem description Windows 10 will not start up. An error message occurs shortly after switching on or the “System Recovery Options” are loaded automatically.
Diagnosis Boot sector or Windows start-up files damaged.
Solution Restore factory settings.
1. Switch on your monitor (does not apply to All-in-One PCs). 2. Switch on your Shuttle complete system.
NOTE: A system recovery from the hard disk (“F8” key) without using a DVD is the quickest method and should be the method of choice.
If the “System Recovery Options” do not start up automatically, please follow the sub-steps below. Otherwise skip to point:
a- Attach a USB stick/USB hard disk to your PC.
b- Insert the "System Repair Disk" or the "External Recovery Media" DVD.
c- Switch on your monitor (does not apply to All-in-One PCs).
d- Switch on your complete Shuttle system.
e- Press the "ESC", "F7" or "F11" key shortly after the monitor posts to access the boot menu.
f- In this menu, select "USB HDD" and confirm your choice.
g- This loads the "System Recovery Options".
h- Continue with Point 3.
3. Select the “Troubleshoot” menu option.
 |
4. In the next window, select “Reset this PC”.
 |
5. A new screen appears telling you which files will be removed. Confirm with “Next”. This will cause your PC to restart. Then follow the instructions on the screen.
 |
Method 3
Problem description Problems using Windows 10. However, operating system starts normally and is functional.
Diagnosis Installation of Windows 10 is slightly damaged.
Solution Restore factory settings.
1. Switch on your monitor (does not apply to All-in-One PCs).
2. Switch on your Shuttle complete system.
3. The PC starts up and Windows is loaded.
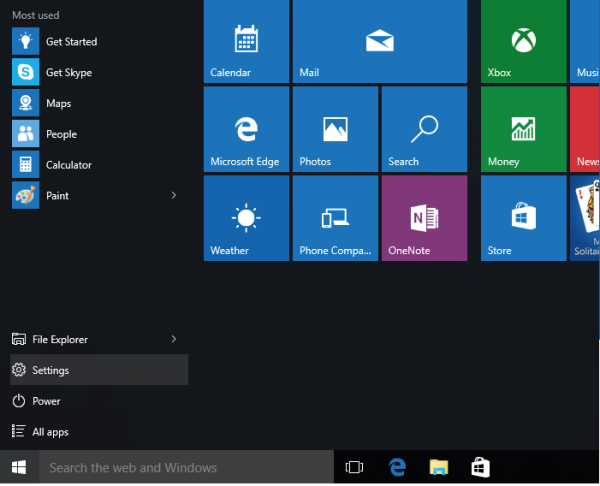
4. Open “Settings” on the “Start menu”.
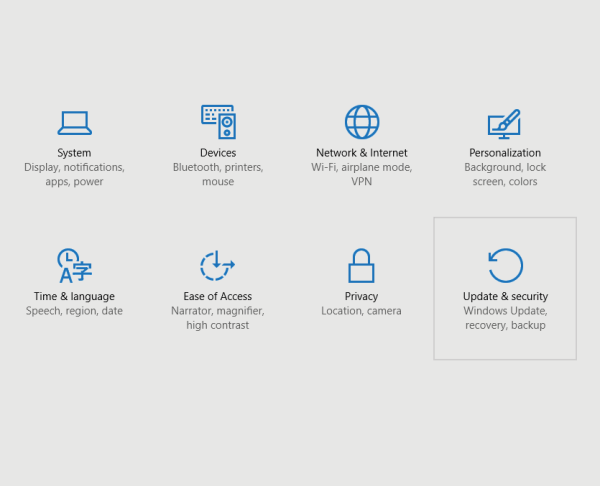
5. In the new window click “Update and Security”.
 |  |
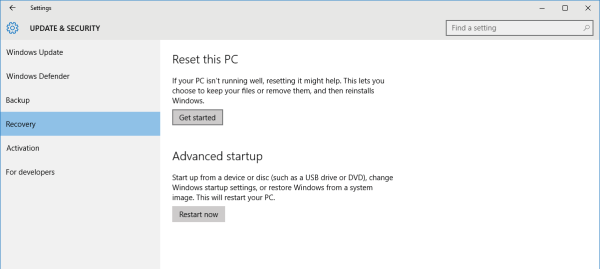
6. Select “Recovery” from the left side of the screen.
7. Under “Reset this PC”, click “Get started”.
 |  |
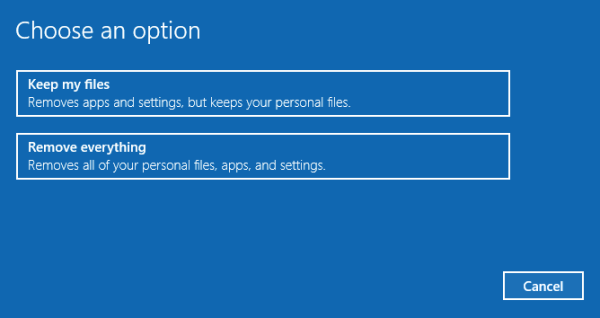
8. Here, you can choose whether to reset the Shuttle complete system or whether you want to “Keep my files”.
 |
9. Afterwards please follow the instructions on the screen.
NOTE: In this case your hard disk is wiped and Windows is reinstalled. Your personal data will be lost. Please be sure to back up beforehand.
Which products still support Windows 7?
| Product category | Products | Processor (socket) | Is Windows 7 supported? |
|---|---|---|---|
| XPC cube | SZ170R8 | Socket LGA1151 | ✔ Only with Skylake processor 1)2) |
| SZ170R8V2 | |||
| SH170R6 | |||
| SH170R6 Plus | |||
| XPC slim (3-litre) | XH170V | Socket LGA1151 | ✔ Only with Skylake processor 3)4) |
| XH110 | |||
| XH110V | |||
| XH81 | Socket LGA1150 | ✔ | |
| XH81V | |||
| XH97V | |||
| XPC slim (1-litre) | DH170 | Socket LGA1151 | ✔ Only with Skylake processor 5)6) |
| DQ170 | |||
| DH110 | |||
| DH110SE | |||
| XPC slim (fanless) | DX30 | Celeron J3355 (Apollo Lake) | ✘ |
| XC60J | |||
| DS77U series | Intel ULV processor (Kaby Lake) | ||
| DS67U series | Intel ULV processor (Skylake) | ✔ 7) | |
| DS68U | |||
| XPC nano | NC03U series | Intel ULV processor (Kaby Lake) | ✘ |
| NC02U series | Intel ULV processor (Skylake) | ✔ 8) | |
| NC01U series | Intel ULV processor (Broadwell) | ✔ | |
| XPC all-in-one | X50V6 | Intel ULV processor (Kaby Lake) | ✘ |
| X50V5 | Intel ULV processor (Skylake) | ✔ 9) | |
| X50V4 | Intel ULV processor (Haswell) | ✔ |

The current Intel driver for Kaby Lake processors only supports Windows 10:
https://downloadcenter.intel.com/download/26836/Graphics-Intel-Graphics-Driver-for-Windows-15-45-?product=97150
Microsoft refuses to provide operating system updates, because Kaby Lake processors are not officially supported by Windows 7:
https://support.microsoft.com/de-de/help/4012982/the-processor-is-not-supported-together-with-the-windows-version-that
How to create a bootable Windows 7 USB flash drive and integrate the USB 3.0 drivers.
Platforms with Intel Braswell-SoC or Series-100 chipsets are missing the EHCI-mode (USB 2.0). These systems are working in modern XHCI-mode (USB 3.0) only. Unfortunately, Windows does not support XHCI out of the box. This leads to a missing keyboard/mouse function during installation. The following FAQ will guide you to integrate the correct drivers in your Windows 7 installation.
First you need the following files:
- Windows 7/8.1/10 PC with 10 GB or more free space
- USB flash drive with 8 GB or more free space
- RUFUS (Tool for extracting the ISO file to a USB flash drive)
- Windows 7 ISO file
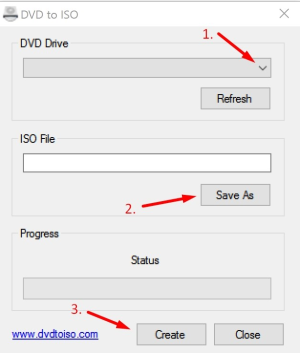
- Start the DVD to ISO programme, select your DVD and select the location where you want to save the ISO file
- Connect the USB flash drive to a USB port and start the downloaded RUFUS-Tool
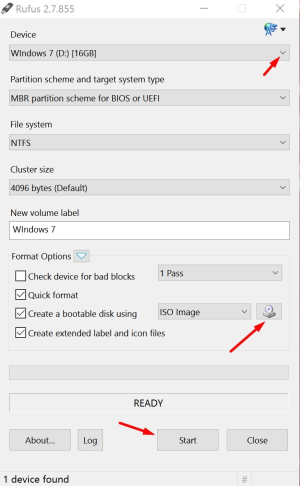
- Check, if the selected USB flash drive is the right one.
- Select the right Windows 7 ISO-File.
- Click Start and wait until the process is complete.
- Start the Shuttle USB-Patcher with a right-click “as Administrator” and press “Next”
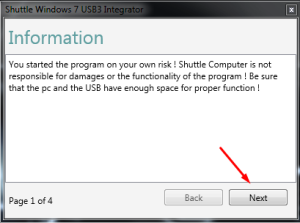
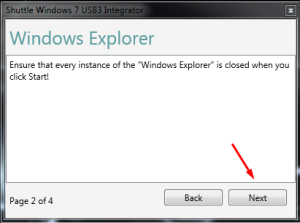
- Close all instances of the Windows explorer and click “Next”
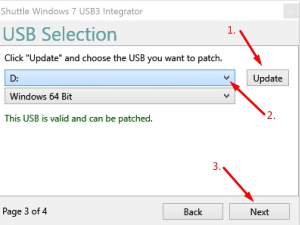
- Click the update button, choose your USB flash drive and press “Next”
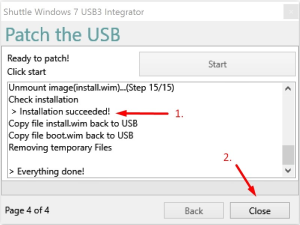
- The last step is to start the process by clicking the “Start” Button. The following process may take some time, please be patient. Once the process is finished, check if the installation has been completed successfully and close the programme.
- Now re-try to install Windows 7.
How to install Windows 7 on a XS35V4 and XS36V4.
The Shuttle XPC slim Barebones XS35V4 and XS36V4 support Windows 7 and Windows 8/8.1 operating systems. Due to the UEFI firmware, only the 64-bit versions are supported and the operating system to be installed must be set in the firmware setup (default setting = Windows 8) first.
Note: The terms UEFI firmware and BIOS are used synonymously.
Please perform the following steps before installing the Windows 7 operating system:
- Please go to the download section on the Shuttle website and check for the latest firmware version.
- Turn on your computer and press the Delete key while booting.
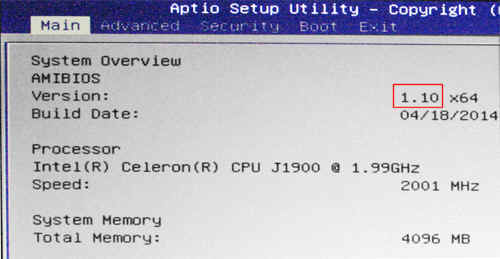
The embedded Aptio Setup Utility (formerly: “BIOS Setup”) appears and shows the current firmware version on its start page.
Windows 7 64-bit is supported since firmware version 1.10. If you have an older firmware, then please first proceed to perform a firmware update to the latest version, before you go on with step 3.
- Please use the Right Arrow key to switch to the Security page.
Change the Secure Boot option to Disabled.
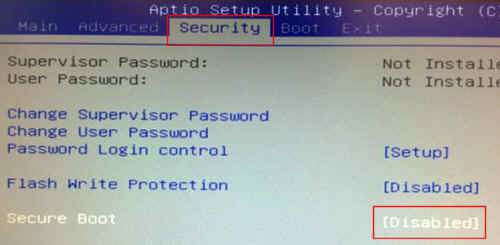
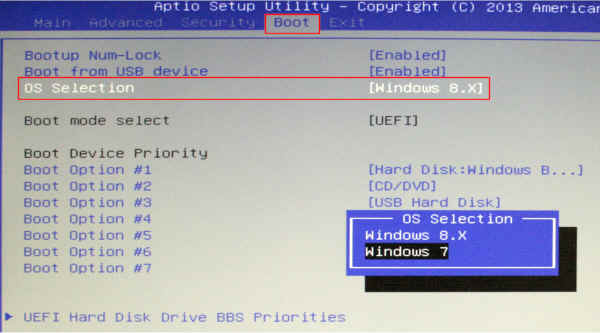
- Please use the Right Arrow key to switch to the Boot page.
Change the OS Selection option to Windows 7, if you want to use Windows 7 as your operating system.
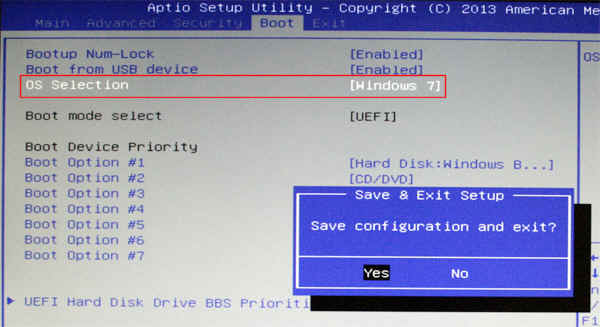
- Save changes and exit by pressing the F4 key and Enter key.
Before you exit, please make sure to connect an external DVD drive to a USB port and have a bootable Windows 7 installation disk inserted.
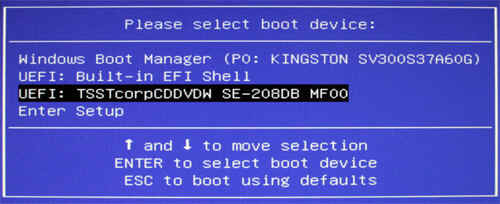
- Please press the F7 key during the reboot process to enter the boot menu.
Select the drive with the Windows 7 64-bit installation DVD and press the Enter key.
- When the message “Press any key to boot from CD or DVD…” appears, then please press any key to proceed.

- Continue to finish the Windows 7 installation.

| Product | Firmware Version | Download URL |
|---|---|---|
| XS35V4 | XS35V400.110 or higher | https://global.shuttle.com/products/productsDownload?productId=1765 |
| XS36V4 | XS36V400.110 or higher | https://global.shuttle.com/products/productsDownload?productId=1766 |
In a Windows 7 installation, how do I set up a RAID-1 configuration with two 3 TB hard drives?
Some of our XPC models such as SH67H3 and SZ77R5 have a problem when installing 3 TB hard drives in a RAID-1 configuration.
Windows will detect them as two 746 GB hard drives instead of a single 3 TB hard drive.
The problem is caused by an outdated Intel RST (Rapid Storage Technology) driver which controls the RAID function in our driver disks. Please download the latest RST driver from Intel’s website to a USB drive and load it during Windows 7 installation. After loading the updated driver, you will be able to see a single 3 TB hard drive.
How to install Windows in GPT mode

- Please insert your Windows 7/Vista 64-bit installation disc into the ODD.
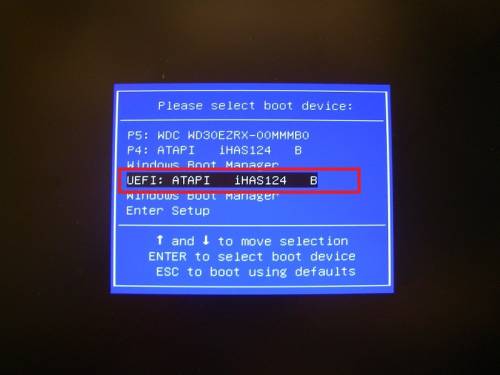
- When booting in POST, please press
F7to enter the boot menu. Please then selectUEFI:, as shown in the below picture.
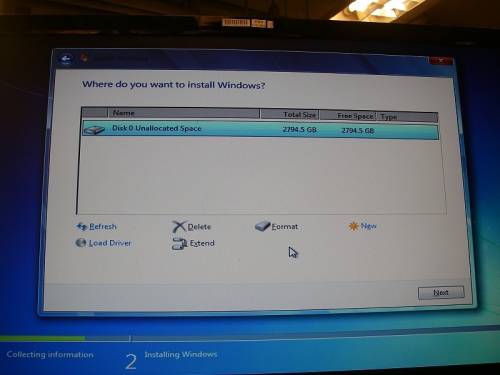
- Proceed step by step in a normal installation process. Should your hard disk have a capacity of 2 TB or larger, you will see that there is only one unallocated Disk Space, as shown on the screen in the below picture.
- After creating the first partition, the system will autocreate one system partition (for Win 7) and one MSR partition (for GPT), as shown in the below picture.

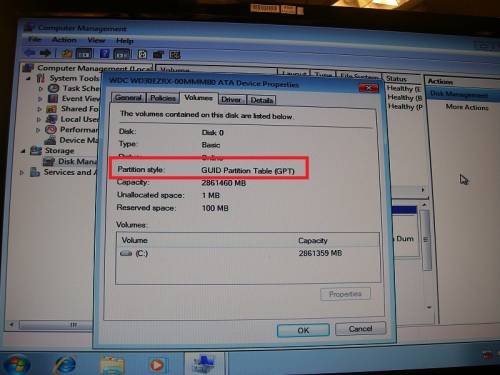
- Once the installation is finished, you can check the hard disk volume information in the device manager. The partition style has now become GPT, not the old MBR. Please see the below picture.
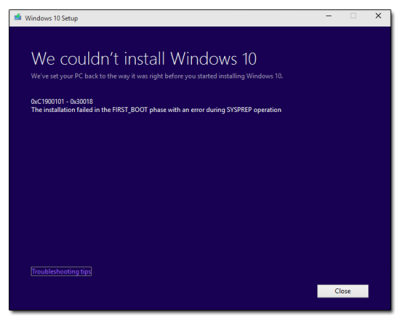
Windows 7 to Windows 10 (1903) Upgrade with USB media. Upgrade Error 0xC1900101-0x30018
This error may happen when Windows 7 is intended to get an Upgrade to Windows 10 version 1903 via USB-Key or USB-DVD. When using USB as source, the installation process may have trouble with the partition table and C:\ location.
To solve this problem, there are two possible options:
- Install the Windows 10 Upgrade from:
- an internal DVD drive (SATA, not USB!).
- from an internal HDD, which is not the system drive.
- Use an older version of Windows 10 (e.g. 1809)
In the following link, the older version of Windows 10 1809 is still available for download: MediaCreationTool1809Oct.exe
NOTE: This link may become invalid once Microsoft decides to take the file offline.
Windows 10 IoT vs Windows 11 Pro
Why use Windows 10/11 IoT Enterprise LTSC vs Windows 11 Pro?
Many SIs/VARs are using the wrong version e.g for POS or Digital Signage solutions and are loading Windows 11 Pro when they should be using Windows 10/11 IoT Enterprise LTSC. This may cause frequent failure of Windows appliances due to running Windows 11 Pro instead of Windows 10/11 IoT.
TL;DR:
Windows 10/11 IoT Enterprise
- Dedicated application, installed by SI/VAR
- Device boots into application
- Full control of Windows updates
- Field of use e.g. Digital Signage / POS
Windows 11 Pro
- General-purpose applications installed by user/customer
- Computer boots into Windows shell
- Forced updates and new builds
- Field of use e.g. Office PC
Key Reasons for Windows IoT compared to Windows 11 Pro
- Enterprise features for full device control
- Full control of the OS
- Easier key and activation process
- Suppress hardware failure and software failure messages
- Full control of Windows updates and prevention from undesired behaviour
- Security updates only, no new builds (forced updates due to end of support) and no forced features
- Long 10 years of support
Windows 10/11 IoT Enterprise is best suited for appliances in public areas e.g. Kiosk or Public Display/Digital Signage. Other embedded device markets: mobile devices, measuring devices, gambling machines, appliances, screens, entertainment devices, image & printing devices, medical systems, industrial automation, ticketing machines, POS, retail devices.
Comparison:
| Windows 10/11 IoT Enterprise (LTSC) | Windows 11 Pro (SAC) | |
|---|---|---|
| Device control | ||
| App Locker | ✔ | ✘ |
| Unified Write Filter | ✔ | ✘ |
| Assigned Access | ✔ | ✘ |
| Shell Launcher | ✔ | ✘ |
| Unbranded Screens | ✔ | ✘ |
| MDM & Group Policies | ✔ | ✘ |
| Credential Guard | ✔ | ✘ |
| Device Guard | ✔ | ✘ |
| Controlled Boot | ✔ | ✘ |
| Software handling | ||
| Microsoft Store | ✘ | ✔ |
| Windows Apps | ✘ | ✔ |
| Channel | Embedded IoT Channel | System Builder |
| Device Use | Dedicated appliance | General use |
| Licensed for | Physical computers | |
| Pricing | € | €€ |
| Life Cycle | 10 – 15 years | 2 – 3 years |
| Support Cycle | 10 years | 1.5 – 2.5 years |
Abbreviations
LTSC = Long Term Servicing Channel
IoT = Internet of Things
SAC = Semi Annual Channel
MDM = Mobile Device Management
OS = Operating System
SI = System Integrator
VAR = Value Added Reseller
Windows 10 compatibility

| Shuttle Product | Windows 10 | |||
|---|---|---|---|---|
| Category | Model | 32-Bit | 64-Bit | Remark |
| XPC cube | SH61R4 | ✔ | ✔ | Please install drivers from our download section or update drivers via Windows update. |
| SH67H3 | ✔ | ✔ | ||
| SH67H7 | ✔ | ✔ | ||
| SH81R4 | ✔ | ✔ | ||
| SH87R6 | ✔ | ✔ | ||
| SH97R6 | ✔ | ✔ | ||
| SH110R4 | ✘ | ✔ | ||
| SH170R6 | ✘ | ✔ | ||
| SH170R6 Plus | ✘ | ✔ | ||
| SH310R4 | ✘ | ✔ | ||
| SH370R6 | ✘ | ✔ | ||
| SH370R6 Plus | ✘ | ✔ | ||
| SH370R8 | ✘ | ✔ | ||
| SX79R5 | ✔ | ✔ | ||
| SZ68R5 | ✔ | ✔ | ||
| SZ77R5 | ✔ | ✔ | ||
| SZ87R6 | ✔ | ✔ | ||
| SZ170R8 | ✘ | ✔ | ||
| SZ170R8V2 | ✘ | ✔ | ||
| SZ270R8 | ✘ | ✔ | ||
| SZ270R9 | ✘ | ✔ | ||
| XPC all-in-one | P20U | ✘ | ✔ | |
| P51U | ✘ | ✔ | ||
| P90U | ✘ | ✔ | ||
| X50V2 Plus | ✔ | ✔ | ||
| X50V3 | ✘ | ✘ | Due to Intel not having plans to release Windows 10 drivers for Intel GMA 3650, this model will not support Windows 10. | |
| X50V3L | ✘ | ✘ | ||
| X50V4 | ✔ | ✔ | Please install drivers from our download section or update drivers via Windows update. | |
| X50V5 | ✘ | ✔ | ||
| X50V6 | ✘ | ✔ | ||
| X70S | ✔ | ✔ | ||
| X70M | ✔ | ✔ | ||
| XPC slim | DH02U | ✘ | ✔ | |
| DL10J | ✘ | ✔ | ||
| DH110 | ✘ | ✔ | ||
| DH110SE | ✘ | ✔ | ||
| DH170 | ✘ | ✔ | ||
| DH270 | ✘ | ✔ | ||
| DH310 | ✘ | ✔ | ||
| DH370 | ✘ | ✔ | ||
| DS10U | ✘ | ✔ | ||
| DS47 | ✔ | ✔ | ||
| DS437 | ✔ | ✔ | ||
| DS437T | ✔ | ✔ | ||
| DS57U | ✔ | ✔ | ||
| DS67U | ✘ | ✔ | ||
| DS68U | ✘ | ✔ | ||
| DS77U | ✘ | ✔ | ||
| DS61 | ✔ | ✔ | ||
| DS81 | ✔ | ✔ | ||
| DS81L | ✔ | ✔ | ||
| DS87 | ✔ | ✔ | ||
| DQ170 | ✘ | ✔ | ||
| DX30 | ✘ | ✔ | ||
| XC60J | ✘ | ✔ | ||
| XH61 | ✔ | ✔ | ||
| XH61V | ✔ | ✔ | ||
| XH81 | ✔ | ✔ | ||
| XH81V | ✔ | ✔ | ||
| XH97V | ✔ | ✔ | ||
| XH110 | ✘ | ✔ | ||
| XH110G | ✘ | ✔ | ||
| XH110V | ✘ | ✔ | ||
| XH170V | ✘ | ✔ | ||
| XH270 | ✘ | ✔ | ||
| XH310 | ✘ | ✔ | ||
| XH310V | ✘ | ✔ | ||
| XS35V3 | ✘ | ✘ | Due to Intel not having plans to release Windows 10 drivers for Intel GMA 3650, this model will not support Windows 10. | |
| XS36V | ✘ | ✘ | ||
| XS35V3L | ✘ | ✘ | ||
| XS35GS V3L | ✔ | ✔ | Please install drivers from our download section or update drivers via Windows update. | |
| XS35V4 | ✘ | ✔ | ||
| XS35V5 Pro | ✘ | ✔ | ||
| XS36V4 | ✘ | ✔ | ||
| XS36V5 | ✘ | ✔ | ||
| XPC nano | NC01U | ✔ | ✔ | |
| NC02U | ✘ | ✔ | ||
| NC03U | ✘ | ✔ | ||
| NC10U | ✘ | ✔ | ||
| XPC accessories | WLN-C | ✔ | ✔ | No driver installation required, will be detected automatically. |
| WLN-M | ✔ | ✔ | ||
| WLN-P | ✔ | ✔ | ||
| WLN-S | ✔ | ✔ | ||