This is an old revision of the document!
KD20
Is the OMNINAS app supported by iOS 11?
OMNINAS for iOS is a 32-bit application. iOS 11 only supports 64-bit apps. Since the OMNINAS app is also discontinued, there is unfortunately no further support.
My NAS shut down unexpectedly. What can I do?
- Make sure the NAS device is in a well-ventilated area. The NAS device will shut down when the HDD temperature is higher than 65 °C.
- Make sure the fan of the NAS device is still working. The fan is designed to spin up if the temperature increases.
- Please note that the NAS device does not support HDDs without temperature sensor support (SMART temperature required).
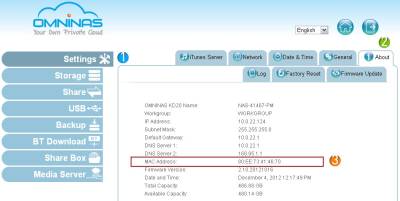
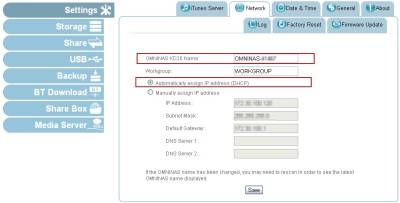
How do I find the MAC address of my OMNINAS?
- It is printed on the bottom of the device.
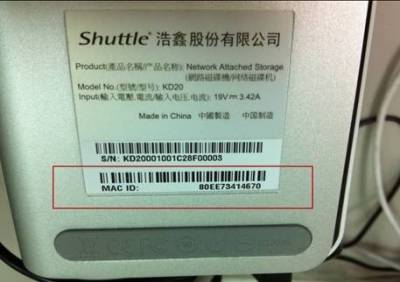
- Otherwise it can be found in the web interface.
How does the Reset button work?
The Reset button can be used when you have no access to the administrator password or intend to reset the network settings. After pressing this button, these settings will be changed to default (see the list below).
- Administration password change to default (blank)
- Network Setting (OMNINAS KD20 Name and DHCP change to Auto)
How do I use the Reset button?
- Turn on your OMNINAS.
- Use a long, thin pin to hold the Reset button for more than 3 seconds until you hear a short beeping. Then the following information will be erased.
- Administrator’s password will be changed to the default value (blank)
- Network Settings (OMNINAS KD20 name and IP address setting will be changed to Auto-DHCP)
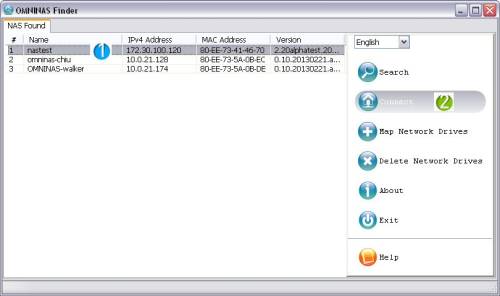
- Please use the Finder software to re-connect your OMNINAS.

- The OMNINAS KD20 name will be changed to default (OMNINAS plus last 6 digits of the Mac address as the default name) and the IP address will be changed to the automatically assigned IP address (DHCP).
I cannot map the network drive.
- Use the delete network drive function to clean any conflicting or unused network drives (in DOS box, use net use * /delete command to clean up all network drives)
- Change the assigned drive letter in the map network drive function by clicking on the downward arrow next to the drive letter to open the drop-down menu.
How do I check my firmware version?
There are two methods to check the KD20 firmware version. One option is to use the Finder software, the other one is the web UI.
- To check firmware with Finder software.
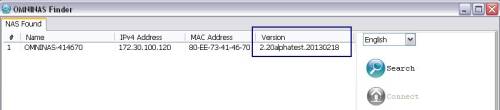
- To check firmware with the web UI.
- Use the Finder software to search your OMNINAS and press connect.
- Log in to the web UI with your details.
Why are my folders limited to a maximum capacity of 99 MB?
This bug has been fixed, please download the latest firmware from the Shuttle website.
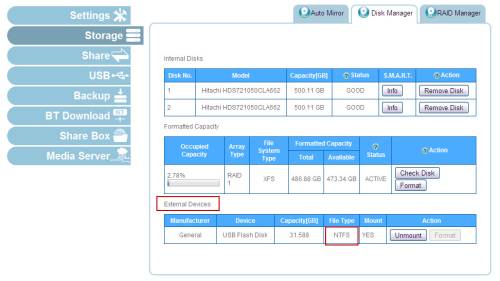
What file system will external storage drives connected to OMNINAS have?
If you format your external devices connected to OMNINAS, they will be NTFS.
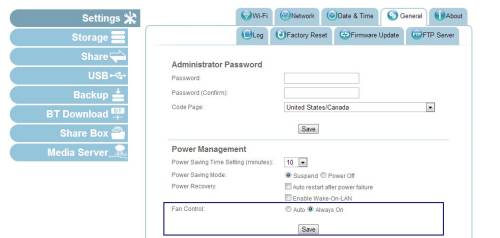
How can I make sure the fan is working properly?
By default, the fan remains idle as long as HDD temperatures are below 55°C, as defined by the HDD temperature reading from HDD SMART function.
The following criteria depicts the system fan behaviour:
- Below 55°C - Fan is off
- 55°C to 59°C - Fan is active
- 60°C to 61°C - Fan cycles above normal speed
- 62°C and above - System shuts down
- Go to web UI and enter the Settings page. Set fan control to “Always on” and then press “Save”.
- Check if your fan is working by touching the back panel.
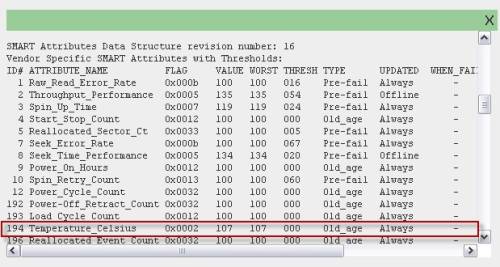
- Go to the web UI and enter the Storage/ Disk Manager Page. Press the Info button in the S.M.A.R.T column.
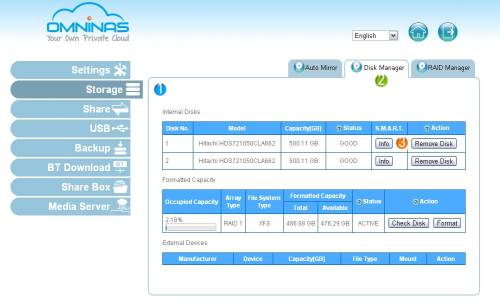
- Check the SMART attributes – ID # 194 to learn more about your HDD temperatures. In this example, the HDD temperature is 56°C with a range of Min/Max 23/63 °C.
- The KD20 will fetch updates of HDD SMART every ten minutes. The fan will be activated if HDD temperatures are between 55°C and 62°C. The system will shut down automatically from temperatures of 62°C and above.

Remark: If your fan won't start spinning if a temperature of 55°C is exceeded, please contact your dealer or Shuttle to exchange the fan.
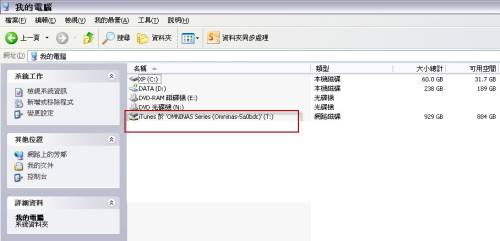
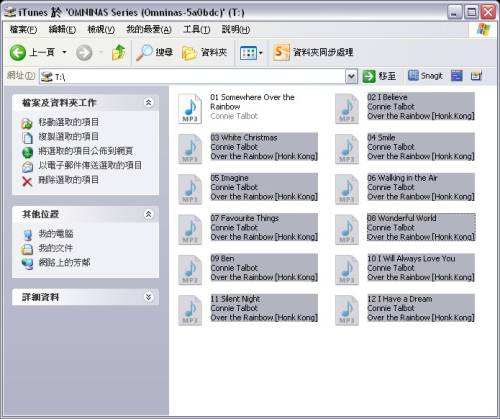
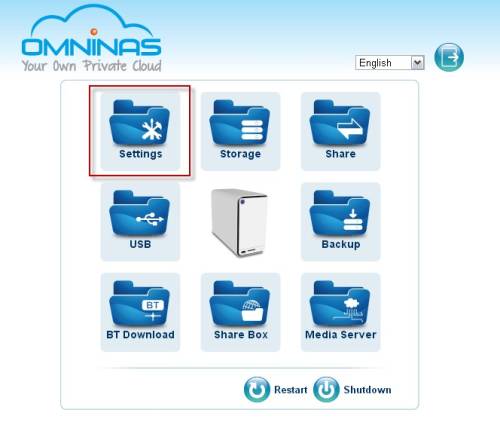
How do I use iTunes?
- Use the Finder software to find your KD20 and click the Map Network Drives. Then press the Connect button to map the iTunes folder as a virtual drive.
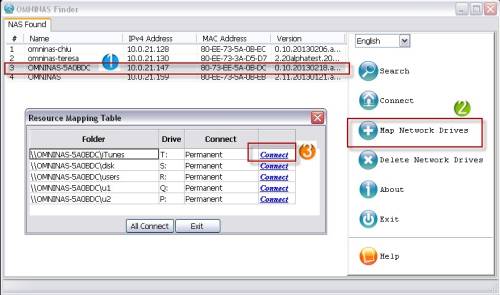
- Your iTunes folder has been mapped.
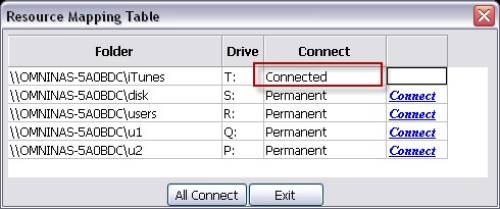
- Under My Computer you should now see it as a virtual drive.
- Drag your music files to the mapped iTunes drive.
- Login to the administrator page.
- Click the Settings icon to enter the settings page.
- Click the iTunes Server Page. Make sure the iTunes Server function has been started and press Rescan if the setting for Auto Rescan is Never.
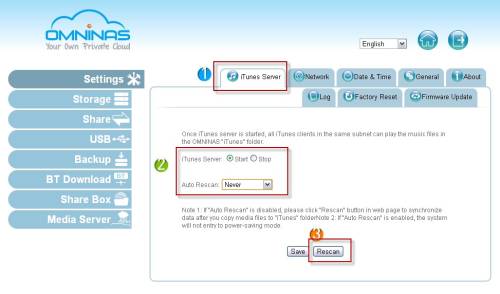
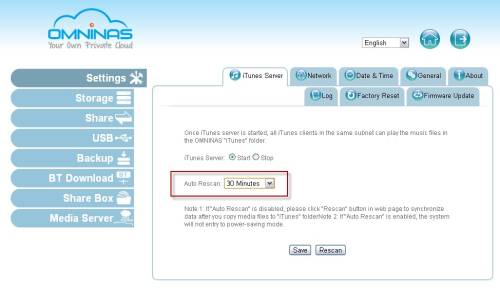
- Note: If the Auto Rescan setting is 30 Minutes/ 60 Minutes/ 90 Minutes/ 120 Minutes, the system will automatically rescan every 30 minutes/ 60 Minutes/ 90 Minutes/ 120 Minutes.
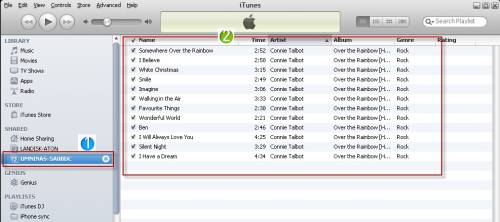
- Now enter iTunes, and you should see the KD20 listed under SHARED. Now click the KD20 to access the music.
- For listening to music from your iTunes folder through the OMNINAS Android/iOS app, please refer to the user manual.
How can I read hard drives from a Shuttle OMNINAS on a PC?
You can also use a PC to access the contents of a hard drive used in an OMNINAS (e.g. KS10 KD20, KD21, KD22) if you don't have access to the original NAS model any longer. However, this is not possible using Windows add-ons alone, so you will need one of the following third-party programs. You may only read disks created in SINGLE or RAID 1. Usually, you cannot read disks created in JBOD and RAID 0 configuration.
Please note: Shuttle cannot accept responsibility for loss of data and damage caused by the use of the following programs:
Can I move hard disks from one KD20 to another?
This question might become relevant in the following situations:
- A KD20 has been replaced (e.g. due to hardware defect)
- After reset to factory default settings
Caution: Shuttle does not guarantee the below procedure works, nor can it be held liable for any damage, loss of data or loss of profit resulting thereof. Even a RAID 1 configuration (Data mirroring to a second hard disk) does not mean you are absolutely safe of data loss. This is may occur through accidental misuse, malicious software or faulty hardware. We strongly recommend you backup all important data on a regular basis and keep this copy separately.
The setting that determines the RAID configuration is stored on the hard disks, so it is basically possible to move hard disks from one KD20 to another. Please do not perform the configuration process on the new KD20 with the old hard disks, since all data would be lost during the formatting process. Please follow the steps below instead:
- Make sure the KD20 is switched off.
- Put the old disks with the important data aside for later use. Please install any other hard disk into the HDD-1 bay in order to prepare configuration of the system.
- Now switch on the KD20. Please proceed the steps for a Single-Disk configuration until you can access the hard disk. The old data of this hard disk will be wiped.
- Switch the KD20 off again and replace the hard disk with your old hard disk, which contains the important data.
- Switch on the KD20. The original status should be recovered now. This includes the RAID mode, user configuration, shared folders and data.
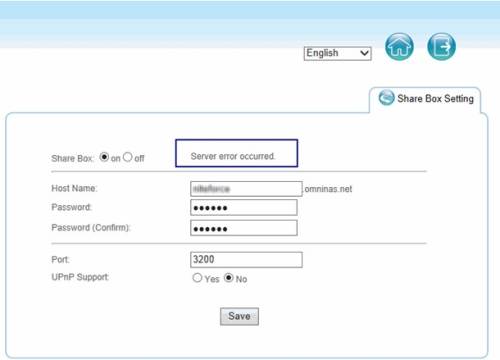
"Server error occurred" when registering Share box
The Omninas.net service “Sharebox” expired at 2017 and is no longer available
Server error means your NAS is not able to connect to Shuttle DDNS server or registration error and it might come with vary reasons. When you see “Server error occurred” message, please select one method to follow the procedures for troubleshooting.
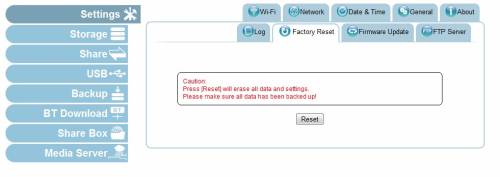
- This is suitable for new user or already backup your data to another drive.
- Go to Factory Reset page to reset your NAS configuration and follow the wizard procedures to complete the share box setup.
- At wizard step 3, it detected automatically if you internet are connected or not connected. Please make sure it is connected for share box registration.
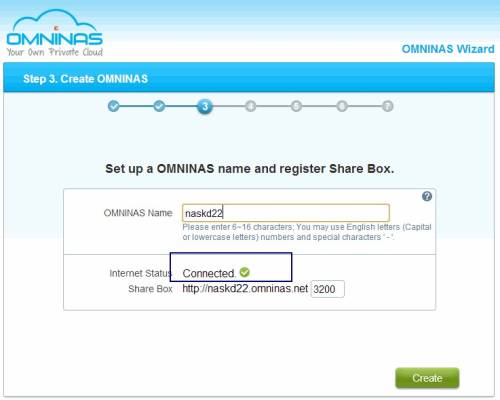
- Share box registered successfully at wizard step 3.

- This is suitable for an advanced user with a technical background.
- Open DOS box and type “ping 8.8.8.8” to check Google DNS connection.
Correct connection will have below screenshot.
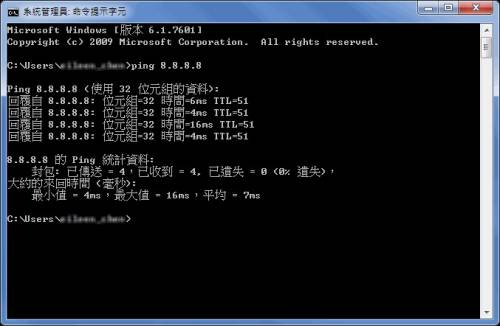
- If you didn’t have see above screenshot and showed connection timeout, please stop and check your internet connection first.
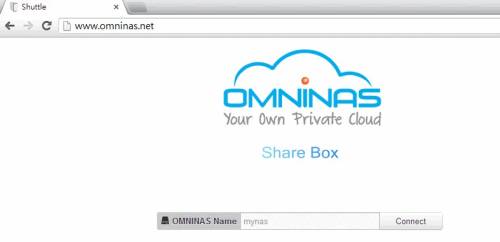
- Type www.omninas.net in browser to check Shuttle DDNS server connection. If the connection has a timeout, please stop and check with your ISP (Internet Service Provider) about your internet access failure.
- If access correctly then type user registered name in “OMNINAS Name” to start the connection.
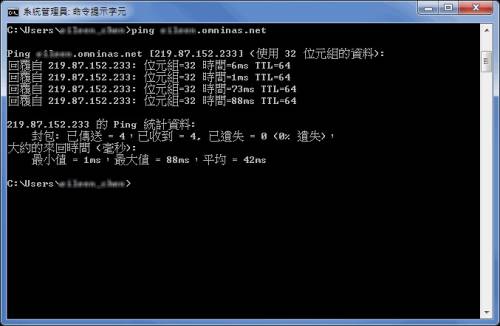
- You also can type “ping XXXXXX.omninas.net” in DOS windows to check the registration is working or not.
Note: Replace the XXXXXX with your registered name.
If it returns with below message means your registration existed at Shuttle DDNS.
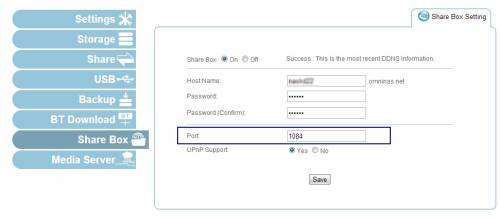
- If your step 5 or step 6 is well connected, then you might need to check your port number assignment.
Change to specific port number which assigned at your router if any.
- You might send your email to our service center to check if your account have been successfully registered in Shuttle DDNS server or not.
- If you still have problem about registering Share box. You might need to change your router setting or work out first with your router administrator.
- Does your router support UPnP?
- Is the UPnP setup enabled in both NAS and Router?
- If no UPnP, did you setup port forwarding in your router with the pport number assigned for your NAS?
During the firmware update process, WEBUI might display "timeout" error message
When there are too many folders in the NAS content (such as 50 or more), the FW update process might take more than 220secs and cause web UI to timeout. This will cause the error message to be shown at the end of Firmware update pop-up screen. User can just press F5 to -reload the web page again, firmware update will not be affected; After FW update completed, NAS will reboot automatically, and user can log in again.
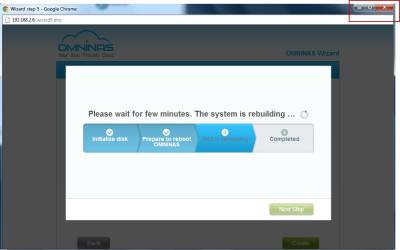
Why does the Wizard stops at Step 5?
There are some routers that might reassign a different IP address when OMNINAS reboots during NAS configuration. It will cause the wizard page be stopped at step 5.
- If you found the wizard stopped at step 5, you can use finder to check OMNINAS IP address.

- You will find the wizard stop at step5 due to the IP address was reassigned by router.
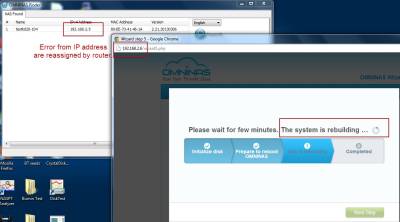
- Close the wizard window and reconnect by finder.
- Then the wizard will restart from next step (step 6) directly. Now you are able to continue the following wizard settings (step 6 and step 7).

I replaced my OMNINAS but I cannot set the Share Box to the same name
The Omninas.net service “Sharebox” expired at 2017 and is no longer available
Every Share Box registered account is connected with one Mac ID address. If you have changed your OMNINAS then it comes with different Mac ID address. You can register another new account or send your request with used old account name to Service Center. We will do the adjustment for you immediately.
Problem: Share Box account has been registered already.
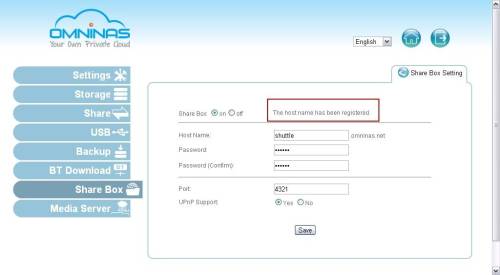
- Submit your request to Shuttle for using a registered account with different mac address. Please provide your registered account name and Mac ID address.
How to install a printer connected to an OMNINAS
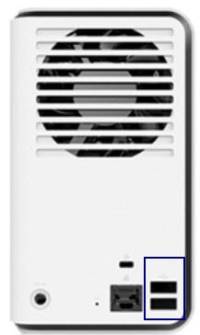
- Connect the printer to one of KD20 USB Port. We recommend connecting to USB2.0 port at KD20 rear panel.
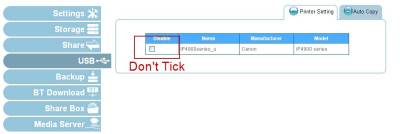
- Go to Printer Setting page to make sure the printer function did not been disabled.
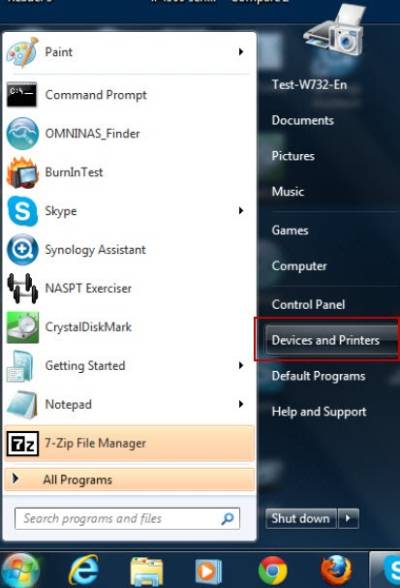
- Go back to Windows Setting. On the Windows Start menu, choose Devices and Printers.
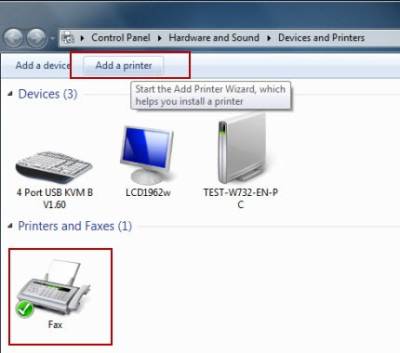
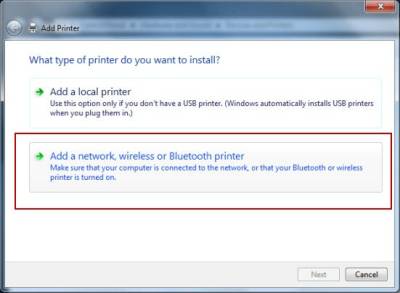
- Press the Add a printer button.
- Select the second option: Add network, wireless or Bluetooth printer.
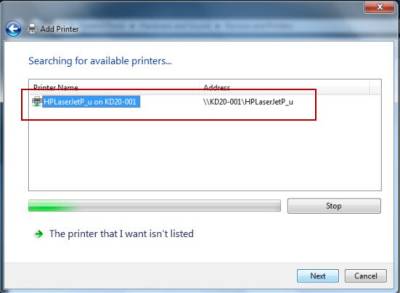
- Look for a printer name starting with OMNINAS name. Select the printer name and press the Next button.
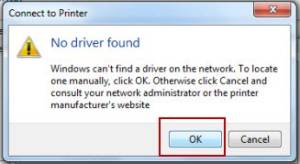
- If Windows cannot find the corresponding driver, the following error message appears, indicating that it is necessary to install the driver.
- Press the OK button.
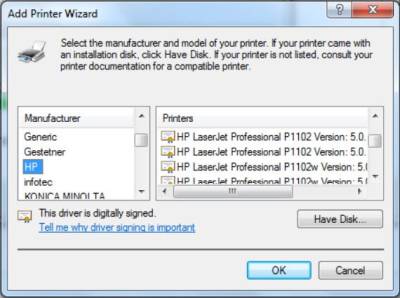
- Either select the printer driver with the printer wizard or install it from the driver disc.
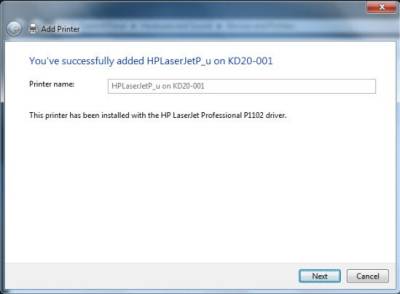
- If all went well, the wizard should be ended with a success message.