This is an old revision of the document!
BIOS-related FAQs
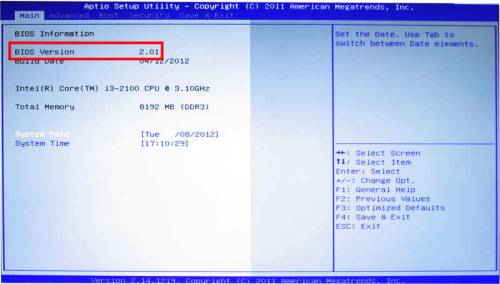
How to find out the current BIOS version?
Start the PC and press the [DEL] or [F2] key to enter the BIOS setup program. The BIOS version is shown in the second line on the main screen.
How to make a bootable USB flash drive?
Warning: Please be sure that there are no other USB devices connected to your system during formatting like external hard disks, external optical devices or other USB flash drives. This ensures that you only format the selected USB flash drive.
- Please download and extract file to get [Rufus tool] from https://rufus.akeo.ie/
- Please run Rufus.exe
- Select your USB flash drive, and press Start button then confirm the following Warning popup.

How to update the BIOS version in DOS (Legacy Mode)?
- Please go to the Shuttle download area and download the appropriate BIOS version.
http://global.shuttle.com/download/download - Unpack the ZIP file into an empty folder.
- Copy the subfolder “DOS” to a bootable USB stick with DOS operating system.
- Boot from the USB stick and change to the subfolder “DOS”.
- Execute the FLASH.BAT file.
- The update process starts automatically. The system will reboot automatically.
- After reboot please enter the BIOS setup program by pressing the “DEL” or “F2” key and load “Default Settings” (F3) and Save&Exit.
How to update the BIOS version in UEFI (UEFI Mode)?
- Please go to the Shuttle download area and download the appropriate BIOS version.
http://global.shuttle.com/download/download - Unpack the ZIP file into an empty folder.
- Copy the subfolders “EFI”, “SHELL” and the file “startup.nsh” to a USB stick, formatted in FAT32.
- Boot from the USB stick. The update will start automatically. The system will reboot automatically.
- After reboot please enter the BIOS setup program by pressing the “DEL” or “F2” key and load “Default Settings” (F3) and Save&Exit.
How to boot from USB flash drive?
- Insert your USB flash drive to your USB Ports.
- During boot process press ESC (or F11 or F7) to enter the boot menu.
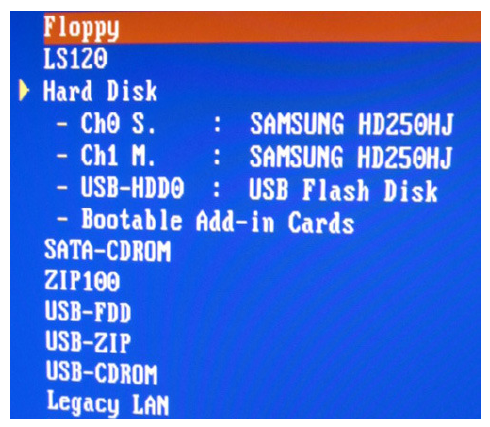
- Select USB-HDD or USB-ZIP (depending on the model of the USB flash drive, it may vary). On our newest XPC Barebones, you will find your USB flash drive, if detected correctly, listed right below your hard disks.
- Press Return to boot from your USB flash drive.
Where and how can I clear CMOS?
All settings and parameters defined in BIOS are stored in CMOS. To delete these settings and reset CMOS, follow the instructions below.
The instructions show examples of where the button or jumper to clear your machine's CMOS is located on different models. If you can't find the button/jumper on your model, more detailed information on type and position can be found in the Quick Guide (QIG) that came with your machine.
Remove the mains plug and reset/press the jumper/button for approx. 10 seconds. You may need to use a pointed object such as a ballpoint pen to push the button. After clearing CMOS, start up the computer and load “Optimized Defaults” in BIOS, save and restart.
![]()
Clear CMOS jumper on the mainboard
![]()
Clear CMOS button on the back of the machine (small opening bottom right)
![]()
Clear CMOS button on the back of the machine (small opening top left)
What is "Unknown flash type" when updating BIOS?
That is a feature on the mainboard that protect the BIOS from being flashed accidentally, it is called BIOS flash protection. Please disable this function by either the hardware jumper or in CMOS Setup Utility. Refer to user manual for more details on disabling flash protection.
How to flash BIOS under Windows?
First please download BIOS from our download page, then step by step follow the below instructions.
Please double check that all drivers are installed.
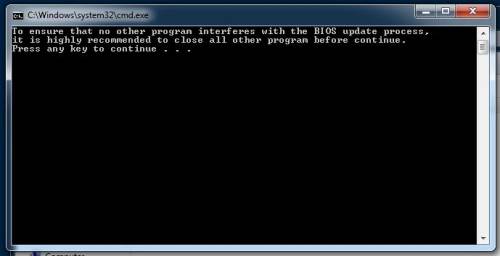
Since background software, like Anti-Virus, may affect the update and leads to a failing flash process, we suggest to update the BIOS in DOS or UEFI mode instead of Windows!!
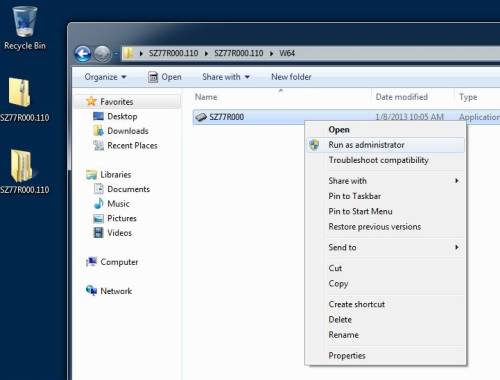
- Please use zip application to extract BIOS file.
- Right-click on the BIOS file and select “Run as administrator” option to start flash tool.
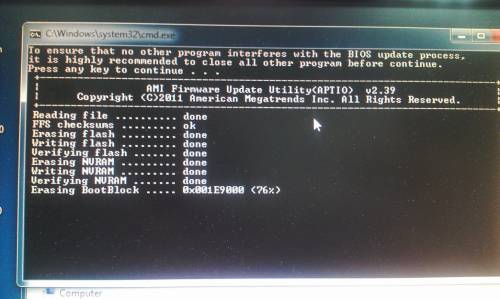
- Please press any key to continue when the below page pops out.
- Wait for the update to complete and don’t close the window.
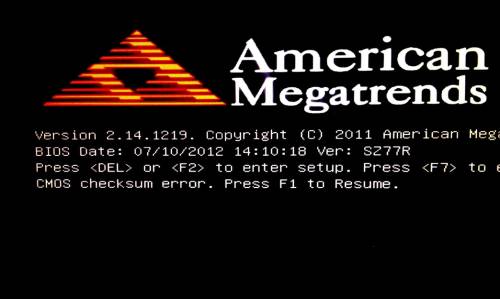
- After flash completed the computer will automatically reboot, please press keyboard “F1” button to continue and press “Del” button to enter BIOS setup menu.
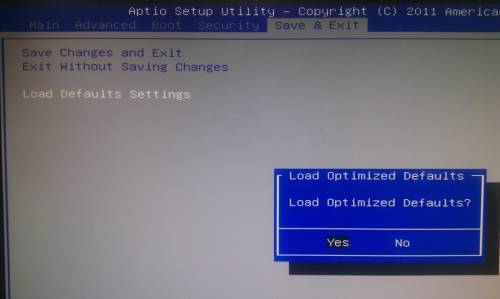
- Please press keyboard right arrow button to switch function to the “Save & Exit” page and select “Load Defaults Settings” option, then select “Yes” to load optimized defaults.
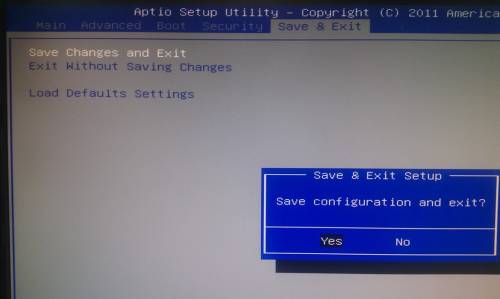
- Please select “Save Changes and Exit” option, and then select “Yes” to save configuration.
- After exiting Bios, the unit will restart.
- Finished.
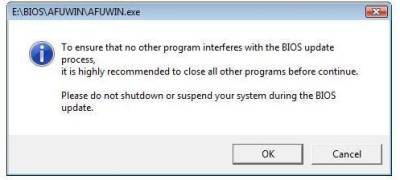
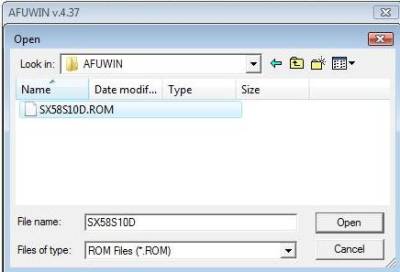
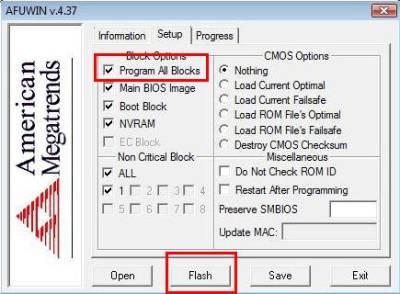
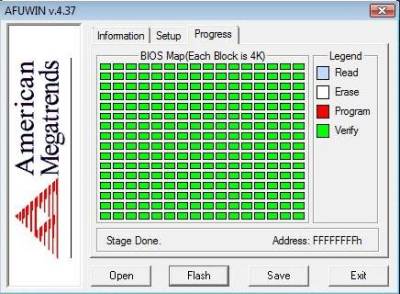
How to update AMI BIOS in Windows?
- Please go to download page and download AFUWIN
- Extract and run the AFUWIN as administrator

- Check the warning and close all other programs then press OK
- Choose Open file

- Choose your Bios then enter Open
- Check the Program All Blocks option then press the Flash button
- Flash finish
- Reboot your machine then enter Bios and Load Default Settings
- SAVE to CMOS and EXIT